The amplification circuits of the original Sound Techniques designs were quite unique. And at the heart of the sound of the console, and the Alpha Range Channel strip, are three of these amplifiers in the signal’s path: the MIC Preamp, the EQ Makeup Gain Amplifier, and the Summing Amp. I covered the channel strip in the manual and last week’s lesson, but I am going to go deeply into the Microphone Preamp in this lesson, combining how it works with some theory to help you understand what it’s doing. Deeply, but not too technically. It’s important to me that you understand in a way meaningful to you.
So, when you instantiate the Alpha on a channel or a bus, the first thing the signal hits is the input, and it is either routed into the Mic Input or the Line Input. This is like virtually any console. On our plugin, the Line Input has no amplifier in the circuit. This is really important because the Line Input doesn’t do any special math to the signal.
Each plugin function performs math—that’s how digital processors work their mojo, and the more math, the more computer processing resources are used. The Alpha Range has very complex modeling, which is why it sounds so authentic to the hardware, but that does come at a CPU cost. The Mic Preamp costs a lot more in terms of CPU than the Line In. If you’re not taking advantage of the Mic Preamp on the Alpha, then switch it to LINE to pull the preamp out of the audio path and the processing path as well.
Dan wrote an article on saving CPU when using the Alpha Range. Click the link below.
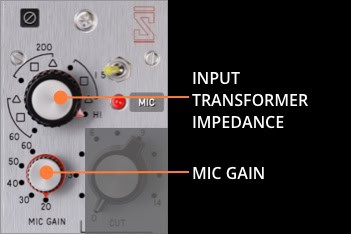
So, the signal comes in and it goes into a Transformer and a pad network, which is controlled by a big knob called the INPUT TRANSFORMER IMPEDANCE knob. What is impedance?
Impedance
Impedance is a way of describing how much a circuit gets in the way of a signal passing through it. This “in the way” affects the signal’s gain, and also its frequency response. Because impedance plays favorites. Some frequencies it lets through easily, other frequencies it hassles a bit and slows them down. Think of a bouncer at a club. Big Bubba Impedance. Your group shows up—there’s a bunch of you. The bouncer lets a few in, then gives one of your friends a hard time, asks a few for their ID, and then, just to be a dick, lets you through last after letting everyone else in before you. You don’t all get into the club at the same time. Your group is delayed.
This phenomenon of frequencies not all getting through the circuit at the same time is called Group Delay, and it causes phase issues. Those phase issues cause changes in the signal’s frequency response. It’s not like, “Where’s the 60 Hz of the kick drum? 2kHz is here. 500hz is here. Oh, there it is half a second later.” It’s not like that. Group Delay manifests as a frequency response thing.
In the days of the Sound Techniques A-Range, getting the mic feeding into the correct impedance was a big deal. Get it wrong and the mic might sound rolled off and quiet. Get it right and the mic would sound its optimal best. Designer Geoff Frost was very aware of this, and went another step further: he added pads that were specific to the impedance setting. Why?
Consoles and channel strips these days mostly use a fixed pad—a single resistor value that pulls off maybe 10dB of gain. But that fixed 10dB pad isn’t going to work the same for all impedances. Depending on the mic, the gain it pulls out could be different, and the frequency response can be affected. Mr Frost calculated pad circuit values for each impedance setting to get the desired gain loss without changing the response of the circuit. This is pretty anal stuff by today’s standards, but at the time, it was simply great, thoughtful design and engineering.
You might be thinking, “But I’m using a digital signal; there is no impedance.” True, but we had that huge knob on the console and couldn’t get rid of it, so Dan did some calculating and came up with a bunch of math to reflect different impedance/pad settings, mimicking the effect of the knob and giving you a creative tool. Impedance is measured in Ohms. And that’s all I’m writing about that for now. Clearly, there was a guy somewhere named Ohm who was deeply involved.
Each impedance setting has a slightly different EQ response, and the pad settings change the gain. The higher the impedance, the flatter the response. The lower the weirder, with 60 being the weirdest, as you can see from the diagram.
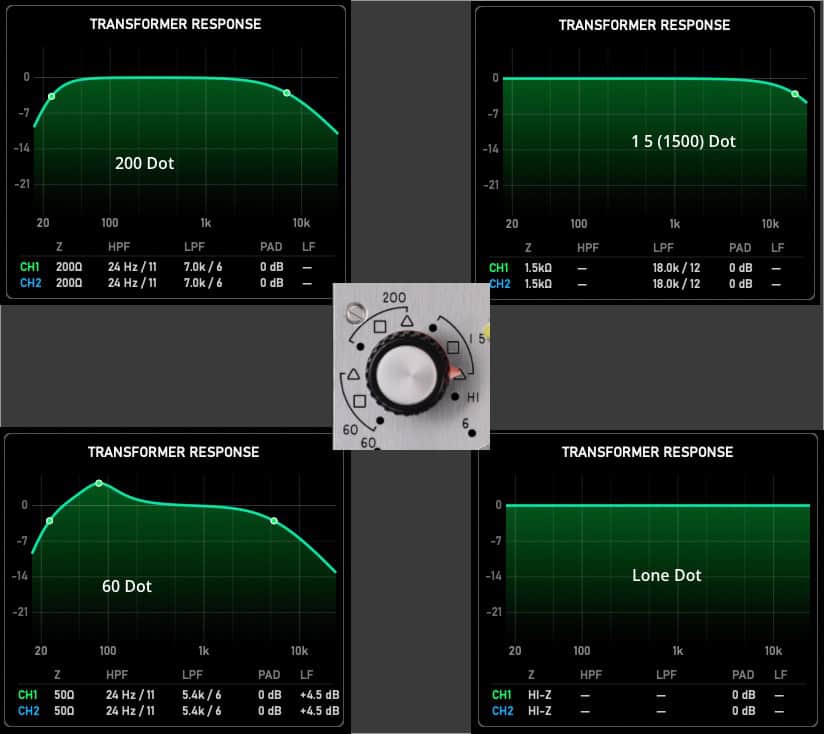
The pad amounts are indicated by symbols, with the dot being no pad, the square being -7dB reduction and the triangle a -14dB reduction. The lone dot fully clockwise is no impedance, no pad.
Let’s put this knowledge to use.
Impedance as EQ
You have a vocal part that is a bit spotty and harsh. With the ITI (I’m tired of typing INPUT TRANSFORMER IMPEDANCE – doh! Just typed it! I’m such a moron. And then I typed my reaction, wasting everyone’s time) switch to the dot at 1500 ohms (it says 1 5 on the channel strip) and listen. It’s rolled off some of the top. Is it smoother? Sweeter? Keep clicking to the dots of the other settings and listening. Which sounds the best?
Yes, we are using the ITI (haha! I didn’t write INPUT TRANSFORMER IMPEDANCE again. DOH! I just did! When will I learn??) as a high end roll off, and at other settings, a band pass, and whatever is going on at 60. And this is part of what happens in the studio when engineers try out different microphone and preamp combinations on a voice, trying to get the one that best suits the source.
Now, the response at 60 ohms is odd. A hump in the lows and a lot of rolloff. Hmmm… why would I want that?
How about on a kick or a bass, or even a guitar part? Wouldn’t it be great to get rid of some unneeded highs and get a big jump on the lows?
Whenever I use the Alpha Range Channel’s preamp I cycle through the impedance choices. More often than not I use one of them.
Now, what about the pad aspect? Surely, we can just not turn the MIC Gain up as much or ride the fader lower? We’re not going to blow anything up if we don’t pad down the source.
Remember that a circuit is reactive. The Mic Preamp responds differently to different levels of gain feeding in.
Pad and Gain
So once we’ve got the impedance picked out, now we play with the gain structure. Turn up MIC GAIN a click or two and listen. Switch the ITI to the Square or the Triangle. Sounds different? Depending on the levels and the source, it might be subtle or considerably different. Turn up the MIC GAIN and it sounds even more different. Change the pad setting and it sounds different yet again.
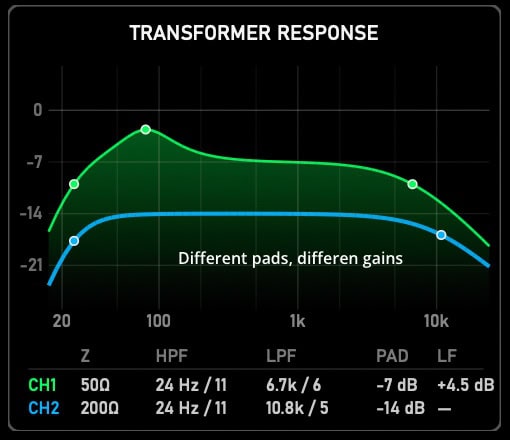
What you’re doing is clipping the Preamplifier, causing saturation and distortion. Clipping usually sounds good until it suddenly doesn’t. What is going on is two basic things. First, when you clip a waveform, you’re pushing down the peaks and bringing up the lower stuff, so it is a form of compression, with instantaneous attack and release. Clip a mic with some room sound on it and it will get more reverberant, similar to if you compressed it with a very fast attack and release. The other thing: as you clip a waveform, it creates harmonic distortion. Harmonics go up, so the signal gets a little brighter, but because you’re actually adding content to the signal—additional harmonics—it gets a little louder as well. So, two kinds of loudness and some brightness. Until it sounds like shit.
PLEASE! Experiment with the GAIN Knob. My rule of thumb is “Two Clicks, Cool! Let’s mix!” I always start with two clicks, but I do gain it up even higher.
AUTO GAIN
The circuit is AUTO GAIN compensating, which means if you turn the gain up 20dB, the output of the amplifier drops by 20dB. This is because things that sound louder typically sound better. Auto Gain drives me nuts. When I turn something up, I expect the loudness to go up, so I click on the Korneff nameplate, and then the AMPLIFIER TAB, and then switch AUTO off (by default it is on).
As long as we’re back here, click on the TRANSFORMER tab and now you can mess with the transformer’s sound.
TRANSFORMERS
Transformers, like all audio components, can be clipped, but nothing with transformers is straightforward. Transformers work by turning electricity into magnetism and then back into electricity. They’re used to change characteristics of the signal and to isolate one part of a circuit from another. The thing is, magnetism sort of “hangs around.” If you magnetize something with electricity, it takes a moment to get to full “magnetic power,” and then if the electricity changes, the magnetism changes a little bit later. It slows the signal down. But… IMPEDANCE! FREQUENCY! It doesn’t slow all the frequencies down at the same time! So what happens is, just like with Impedance the bouncer, some frequencies get through quicker than others. The result is that the signal, especially the transients, smear. Because the various components of the transient don’t all arrive at once. Transformers: another reason ALL PREAMPS SOUND DIFFERENT.
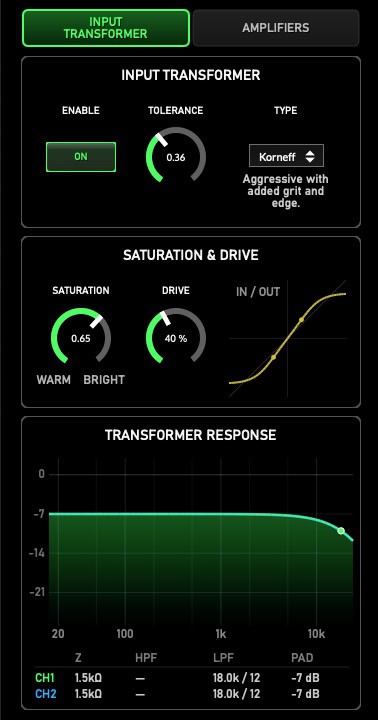
And then there’s transformer saturation… if you stuff a lot of electricity into a transformer, eventually you get to the point where there’s no more magnetism to be had: it runs out. And when things run out, you get clipping—the waveform gets clipped. I wrote a bunch on what causes distortion here.
The thing is, saturating a transformer and getting that magnetic clipping sounds kinda swell. Turn up DRIVE and there’s almost always a spot that sounds fabulous. This is the equivalent of sending more power through the transformer. Play with SATURATION and it affects the tonal color of the output of the transformer. You can think of DRIVE as how hard you slam signal through the transformer, and SATURATION as how easily the transformer saturates. If you look at the Transfer Curve, SATURATION kinda makes it smaller.
I’ll write a whole thing on transfer curves some other time to keep this lesson from becoming Tolstoy’s “War and Preamps.”
TOLERANCE… You’re making a smash burger. It comes out delicious. Your friends come back the next day and demand more smash burgers. You make them, but it isn’t quite the same. One of them sucks. It was longer on the grill, you didn’t smash it as much, etc. This is HIGH TOLERANCE. There’s room for things to be different. You’re working at McDonald’s and popping out them burgers and damn if they aren’t clones of each other. This is LOW TOLERANCE. There’s not much room for difference. On the Alpha Range, high tolerance means there are differences in the components. Things don’t exactly match the values on the circuit diagrams, and every channel on the console might sound a little different. Set it to LOW, and the channels match the diagram and each other closely.
TYPE is two different saturation “styles.” ST is faithful to the sound of the actual channel strip—it is a more gentle sort of saturation. KORNEFF is much more aggressive, and this is because Lily, Dan’s dog, bites everyone. Even people she knows. Maybe we’ll change the name of that setting to LILY in the future.
Click on AMPLIFIERS.
AMPLIFIERS
You’ll see there are three. We’re looking at the top one, the MIC PREAMP amplifier. AUTO we talked about—that’s the auto gain control. COMPONENT TOLERANCE, we talked about that. Set it higher for more anomalies. I use this always when I want the left and right sides of a stereo signal to sound more separated.
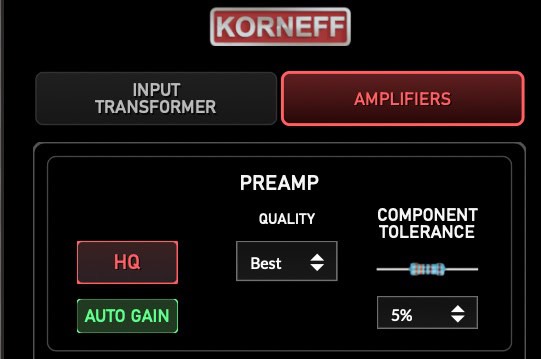
HQ… Dan wrote a long explanation of this, but basically, HQ changes the way the math is calculating the response of the amplifier. It’s like it switches into SuperAnal mode and keeps doing the math again and again until it’s perfect. It sounds more natural and frankly gorgeous, but it really uses up CPU. FAST is the least hungry of the HQ settings, NORMAL uses more and BEST is simply a glutton. If you’re using HQ everywhere, you’re going to run your computer out of steam and it’s going to stutter and stall and not play. If you really need to use HQ BEST, you’re best off offline bouncing the track and then use that in your mix rather than trying to mope through with a CPU having an aneurysm.
The Mic Preamp doesn’t have a CALIBRATION knob like the other amplifiers below the PREAMP. Well, it does—the MIC GAIN knob serves the same purpose. What does CALIBRATION do? I just gave you a hint. Play around and find out. You can’t hurt yourself.
With all of this, play around and try it. Put the Alpha Range on drums, bass, vocals, across the mix bus, everywhere. Discover where you like it best, but don’t be surprised if you like it everywhere.
Next lesson: that strange EQ.