
At Last! Gain Staging
Here we are - the end of the line for this series of posts on levels, noise, distortion, etc.
Gain staging... from all the talk in online forums and people saying, “Well, you really need to watch your gain staging,” you’d think there's some sort of mystical science magic to it, but it’s really simple.
Gain staging is making sure that each piece of equipment in your signal chain has the best possible signal-to-noise ratio and enough headroom to prevent unintentional distortion.
We have to cover two concepts really quickly, then I’ll tell you how to gain stage things, and we’ll finish off with some tips (rules, suggestions) that make this even easier.
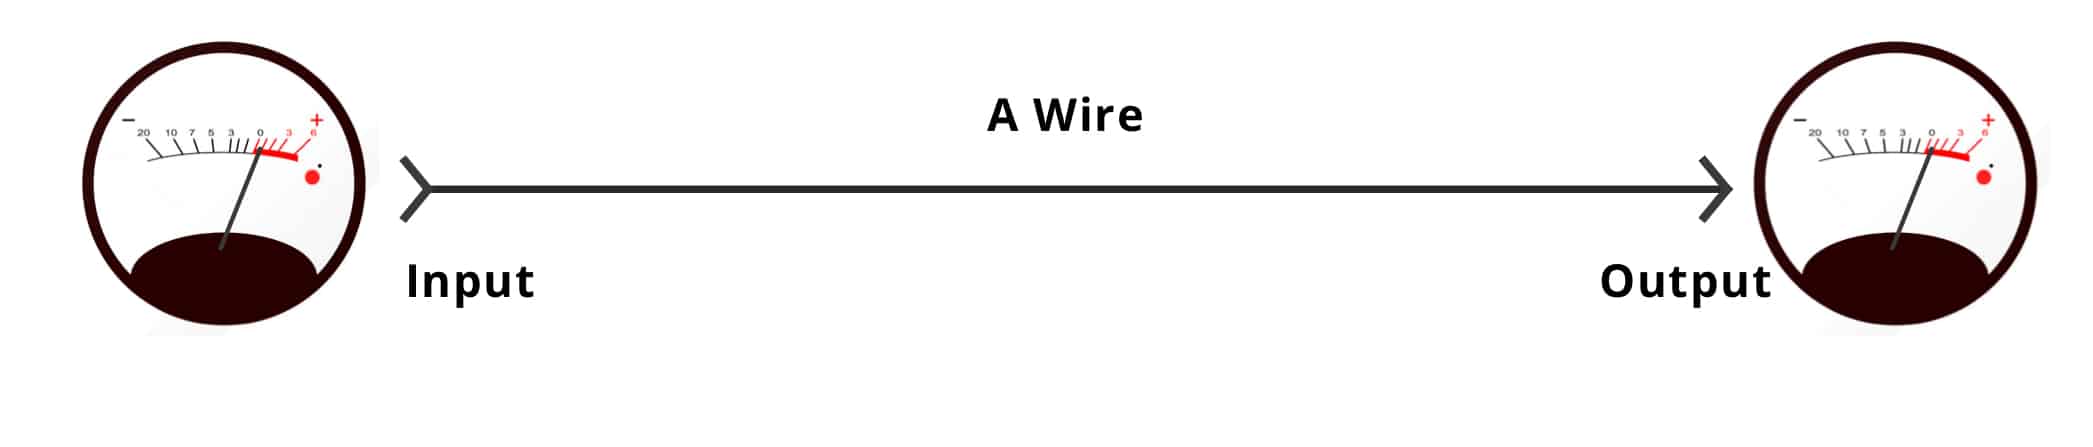
UNITY GAIN
What this means is that the level flowing into the piece of gear is the same as the level flowing out of the piece of gear. Think of a wire. If you feed a signal into a piece of wire, and the wire isn’t really tiny or tremendously long, the amount of power feeding in is the same as the amount of power feeding out.
If you don’t understand this diagram you should give up.
If we stick a bunch of amplifier circuits and EQ circuits and processor circuits between the input and the output, unity gain is still what we want to have happening.
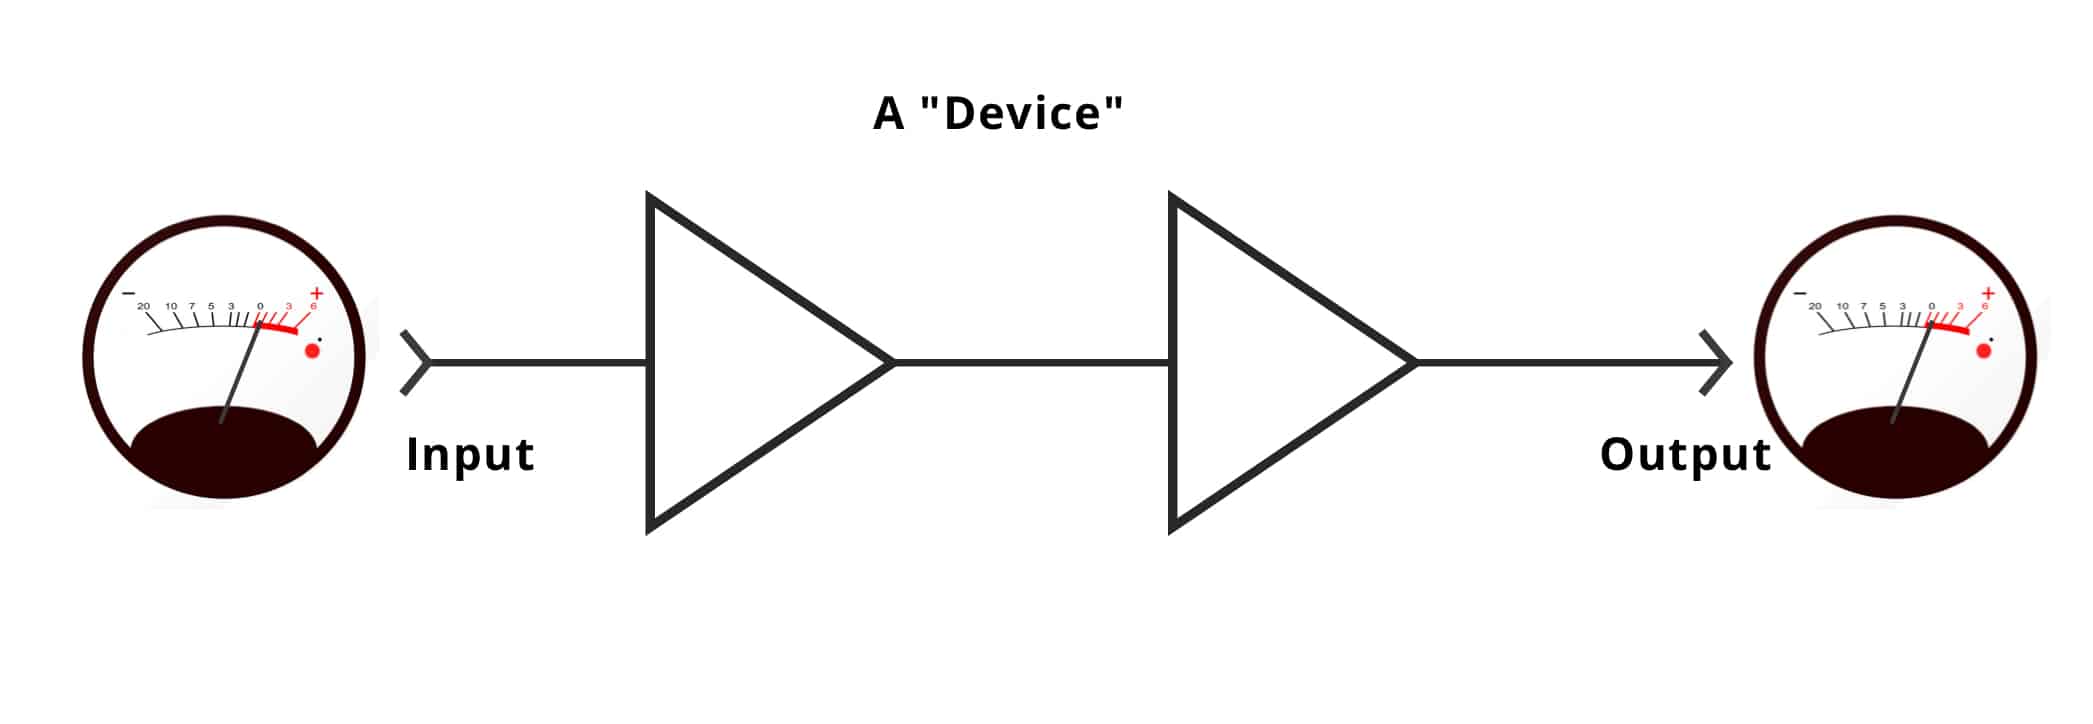
The triangle thinger means Amplifier.
Now, there’s usually something to control Input Level, we sometimes call this a TRIM, and there’s usually something to control Output Level, and this can be called Output Trim, or Output, or it can be a fader, or, in the case of a compressor, it might be called Make-Up gain, or it can have a Make-Up Gain AND and Output level, but the basic idea is the same: There’s something to control the level of what feeds in, and the level of what feeds out.
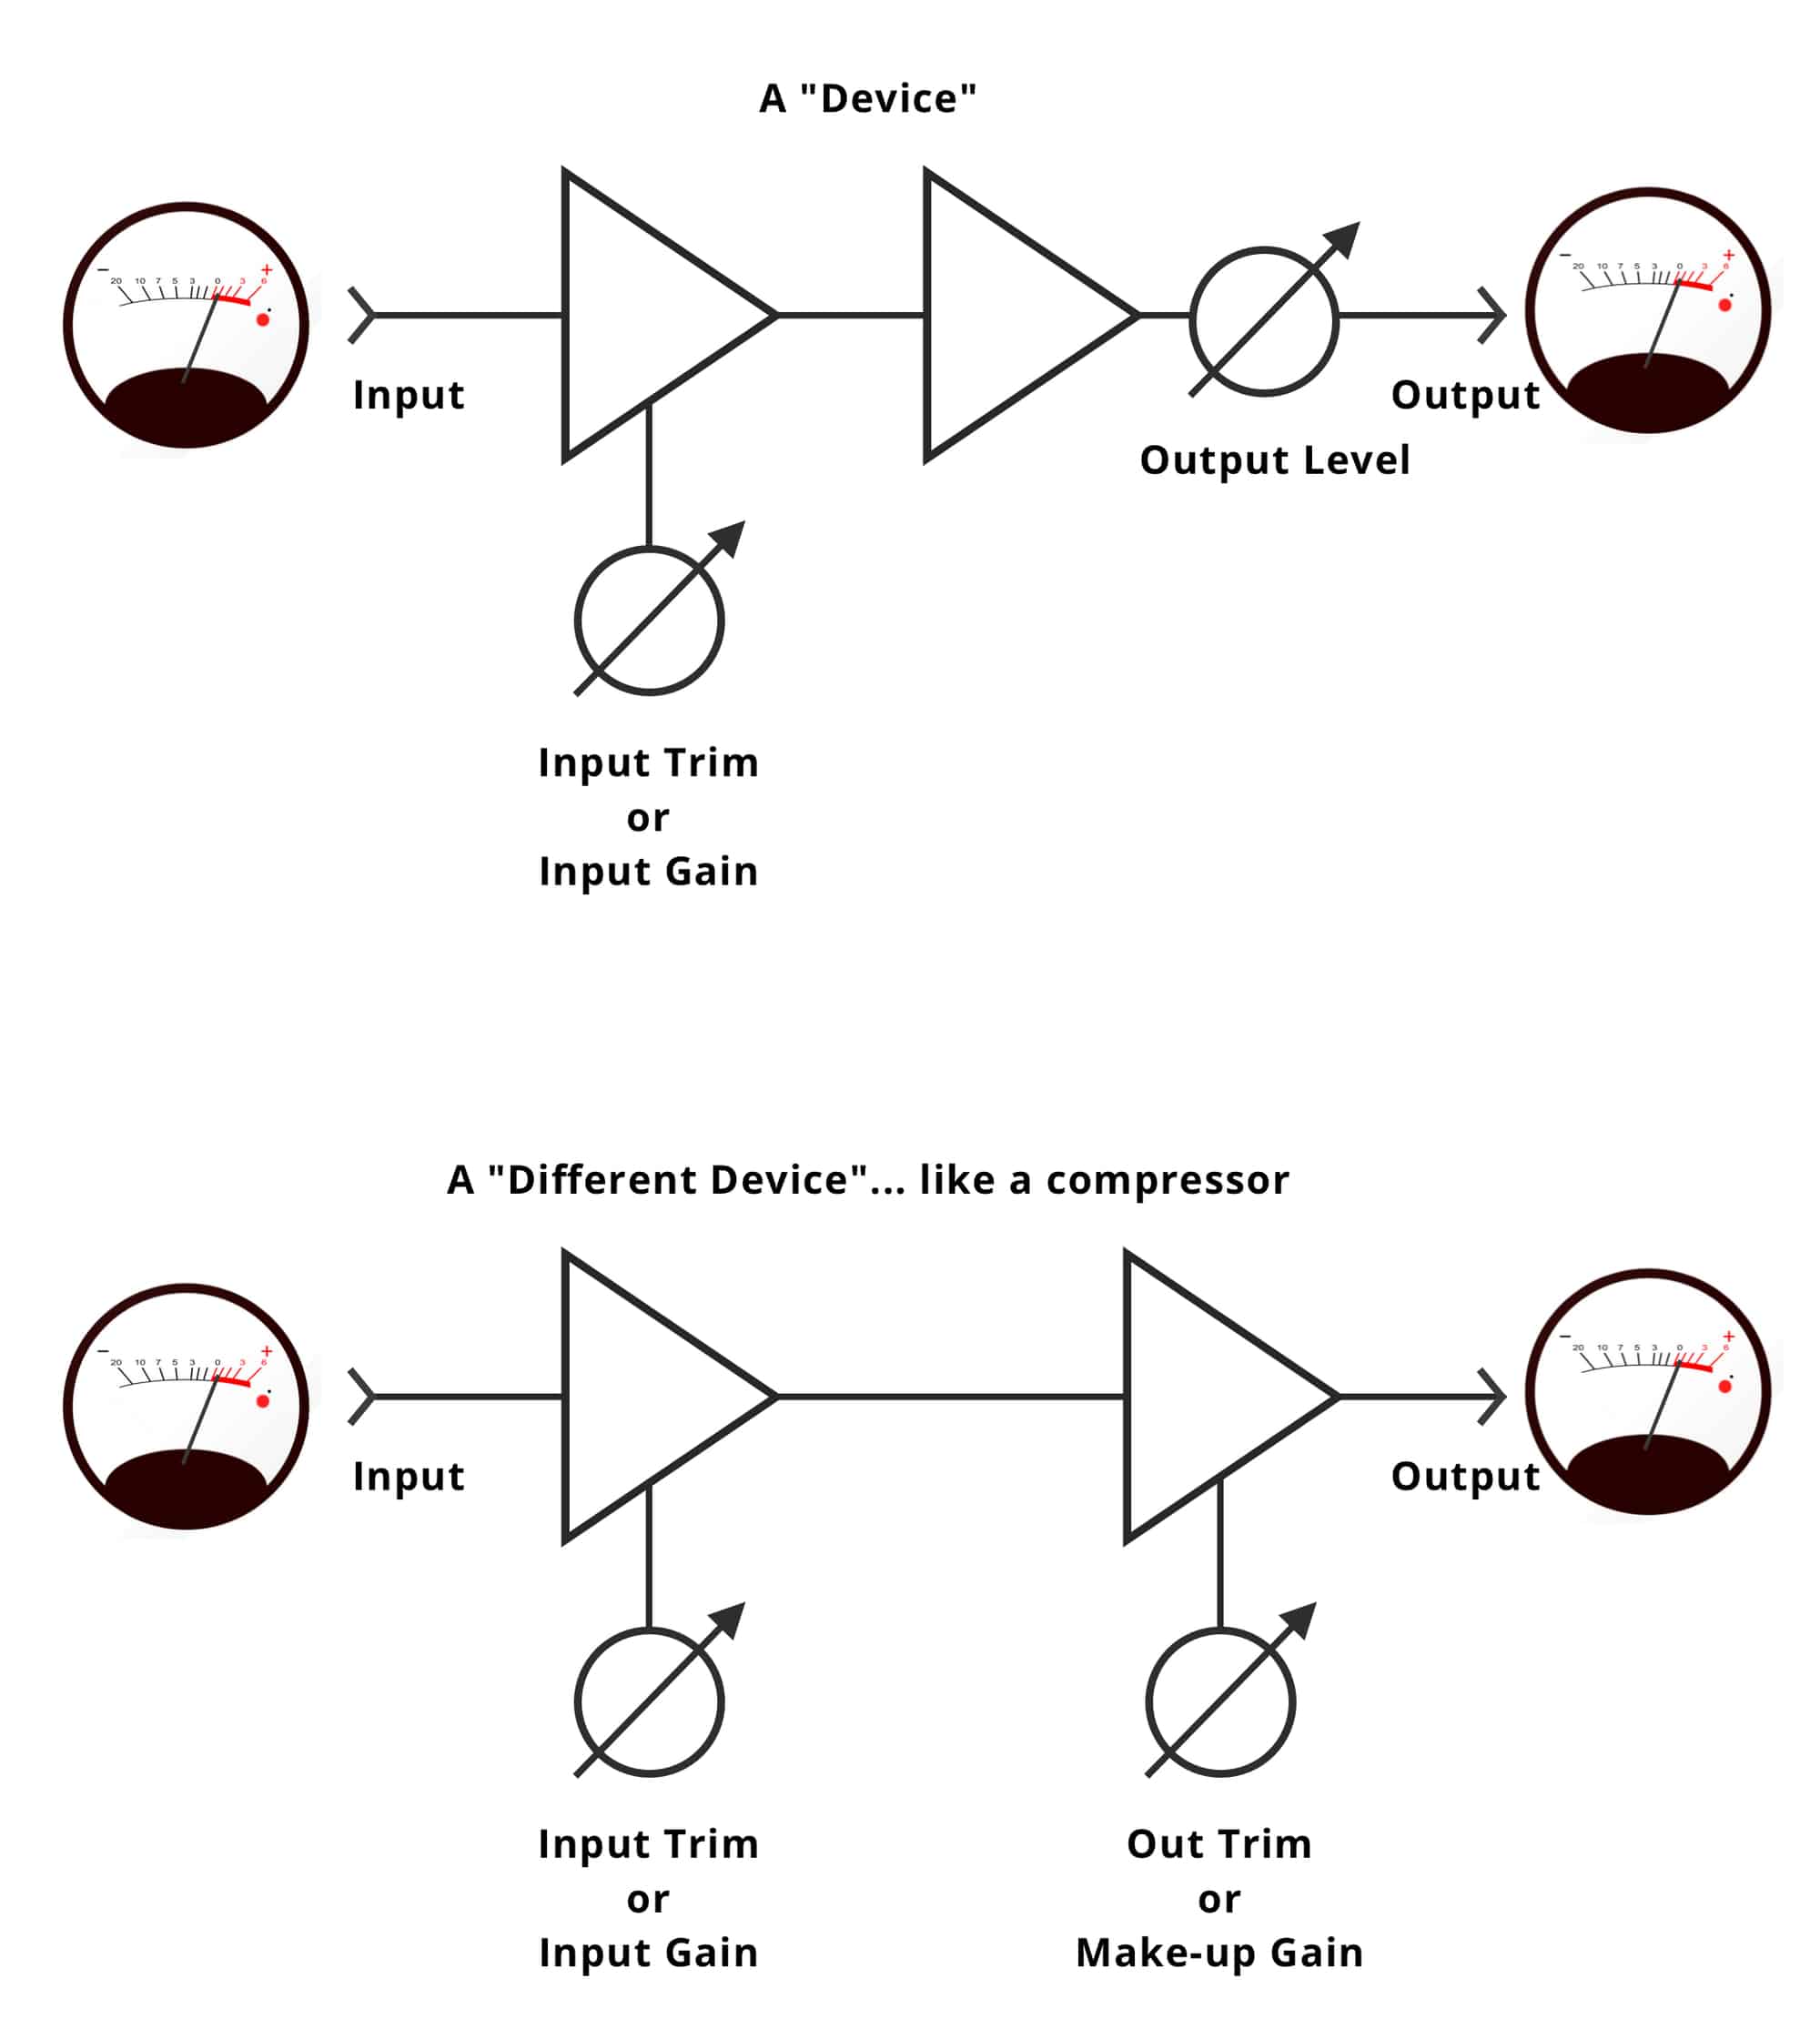 Round thing with an arrow through it means potentiometer, or a knob. Look at you! Reading signal flow like a goddamn boss!
Now, most equipment has some sort of meter - ranging from a couple of LEDs to a mechanical VU meter, and that meter is usually located after the Output level somewhere, but sometimes it is switchable, which is nice, because then you can see what your input level is before it processes things, compare it to the output level, etc.
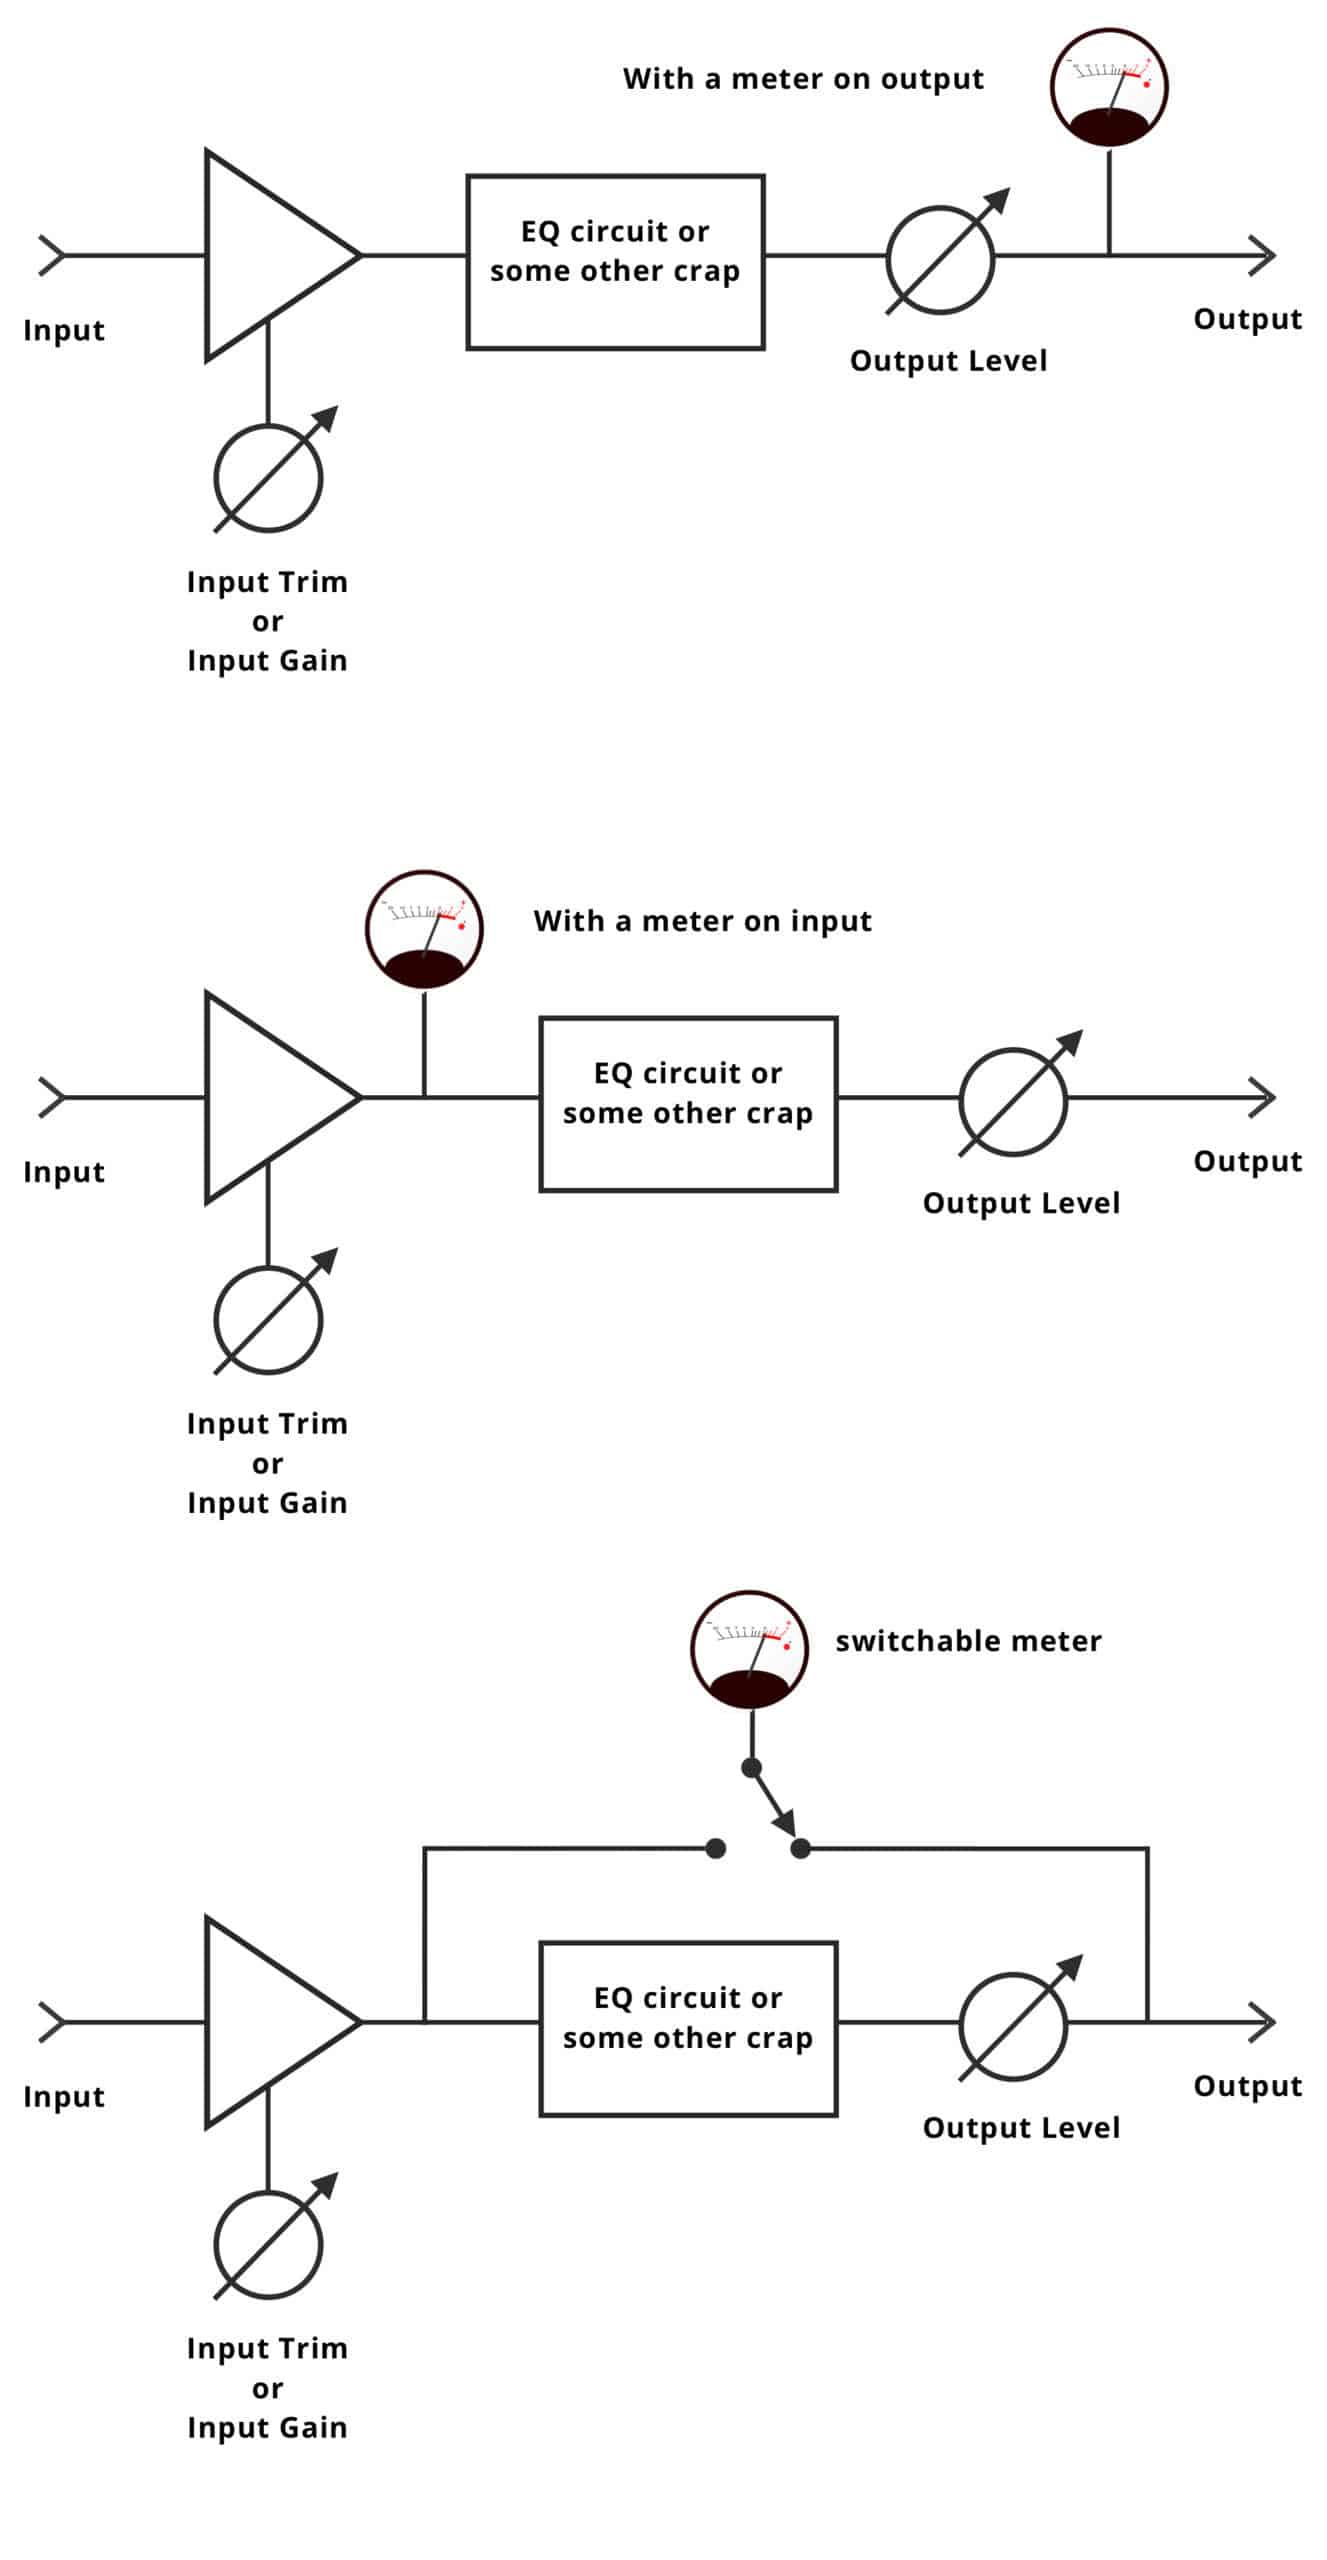 Can you figure out the symbol for a switch?
SO, you’re always aiming for Unity Gain with each piece of gear, and what we want is the input level set so that the meter reads nominal, and the output level feeding out is at nominal. To do this, we set the level control knobs at the position that gives us Unity Gain, and that position is usually marked with a ZERO or some such.
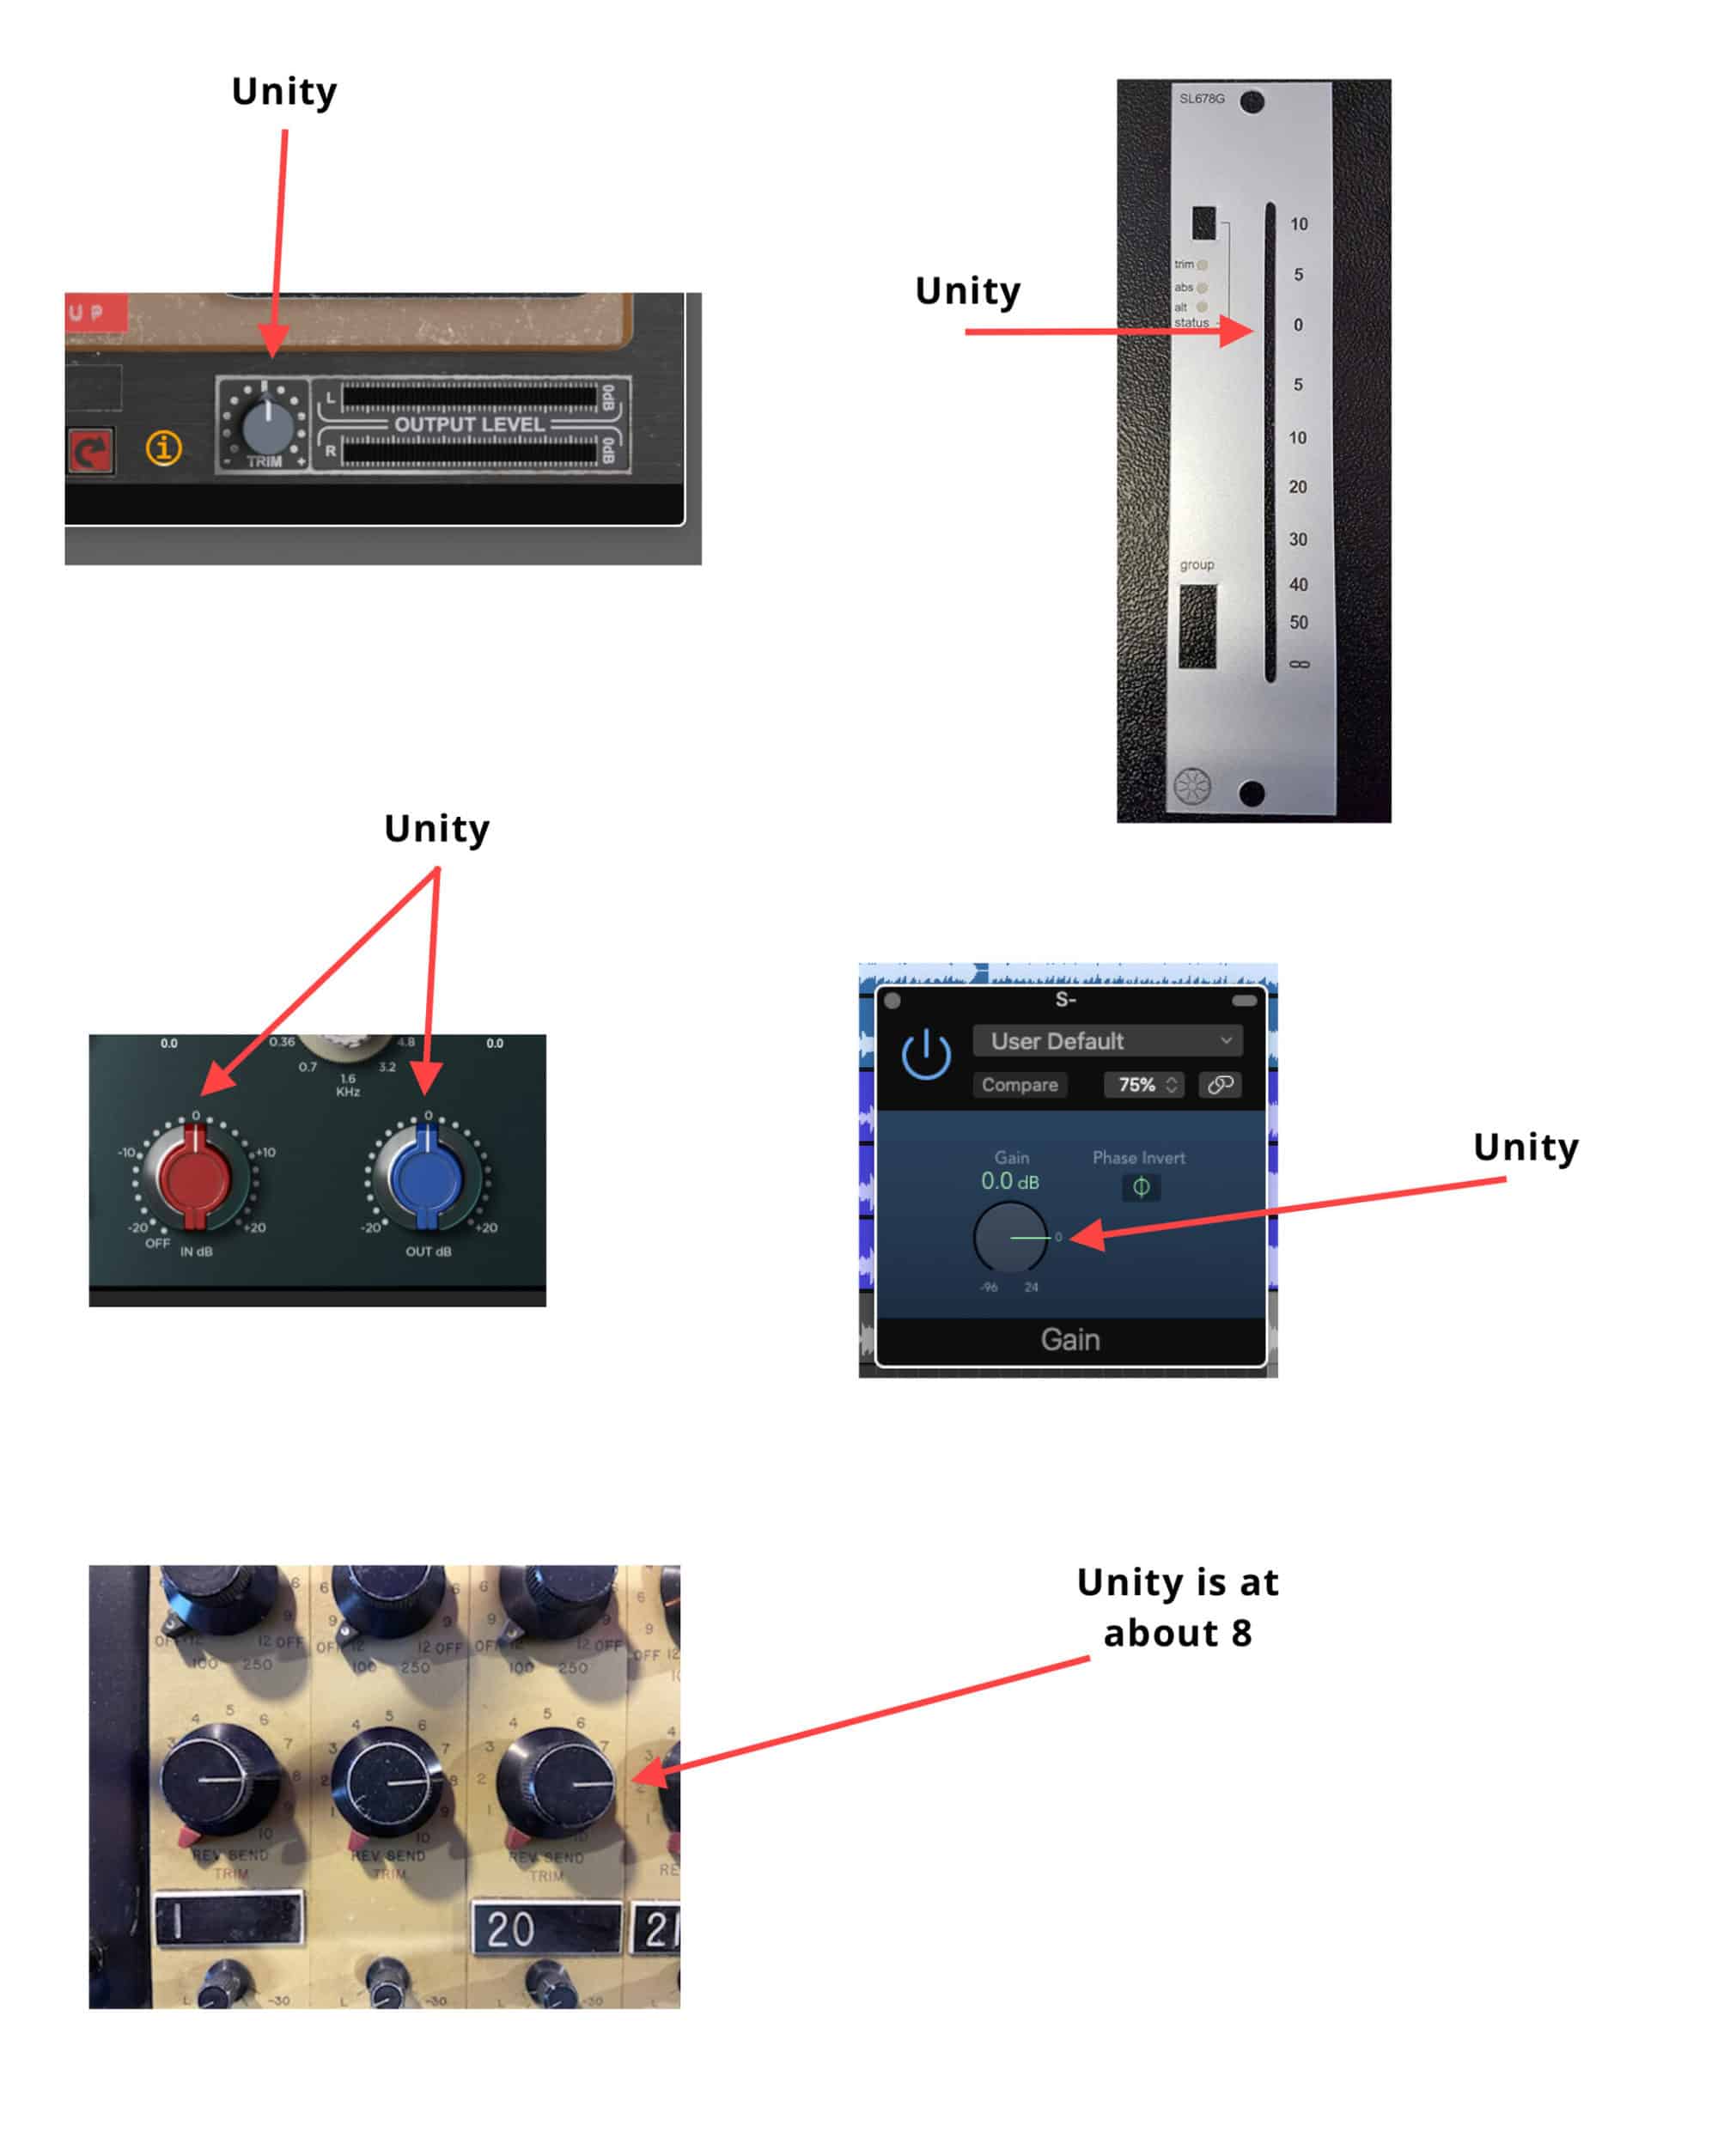
The many faces of UNITY.
Set Things to Unity Gain
This is easy. Grab your OUTPUT LEVEL knobber and set it 0. So, if it’s a fader on a console you slide it up to 0, the output knob is at 0, etc. What if the Output Knob is labeled from 0 to 10? Set it to 8, or set it to 10, it depends on the circuit and we’re not going into that here.
Next, feed signal into the input, turn up the input gain until the METER is hanging around 0, which indicates nominal level. Now you’ve got something really close to Unity Gain happening for that piece of gear. Will the meter go up and down? Yes. But you’re not chasing the meter. You’re looking to get the meter hanging around 0, or nominal level. Don’t be too fussy. Just get it close.
Remember, the Unity position on a knob or a fader is at ZERO. 0. When you set it to Unity, that’s where it goes.
The next step is to feed the Output of one piece of equipment into the Input of the next piece of equipment. NOW... this might get a bit tricky, so we have to cover Operating Level quickly.
OPERATING LEVEL
Simply put, Operating Level is the amount of power a piece of equipment wants to see at its input and output. This is what you’ll usually run into:
Mic Level is the level of power coming out of a microphone and it’s REALLY LOW. How low? Like -50dBu. What does that mean? It means really low. Don’t worry about it. Mic Level is so low that you can’t do anything with it until you bring it up to Line Level. That’s what a Mic Preamp does - it brings a Mic Level signal up to Live Level.
Instrument Level is the amount of power that comes out of a bass or a guitar with a passive pickup. It’s also really low, and in my mind it's basically the same as a mic level signal. For those advanced campers, I’m ignoring impedance today. If you don’t understand that previous sentence, that’s fine. You'll get there eventually.
Line Level is the level of power flowing through gear - consoles, tape decks, compressors, coming out of synths and keyboards, etc. There are three possible line levels: Consumer, Pro Audio and Broadcast.
Consumer line level is -10dBV. This is the line level of home stereo equipment and also output level of a lot of synths and keyboards. What does -10dBv mean? Well, it means if the thing is set to unity you have -10dBV feeding in and -10dBV feeding out and that’s all need to know. -10dbV is a LOT more powerful that -50dBu. Ignore all the V’s and u’s for now. -50dB is less than -10dB, right? Close enough for rock and roll today.
Pro Line Level is +4dBu. This is hopefully what the majority of equipment is at in your studio. Can’t tell? Pro equipment uses bigger, heavier, tougher connectors. Consumer stuff uses shitty little connectors. With pro line level stuff, if the meter is at 0 and gain is at unity, you have +4dBu feeding in and out. And it’s got a lot more power than -10dBV consumer stuff. Again, ignore the V’s and u’s and just look at the numbers for now. +4 is more than -10 and a lot more than -50.
Broadcast Level is +8dBu. I don’t even know how common this is anymore as I don’t do work in radio stations or TV, but it is 4dB hotter than Pro Line Level. You can probably ignore this.
Speaker Level is what comes out of a power amp and plugs into a speaker. It’s like a SUPER BOOSTED line level. Line level is too weak to move the diaphragm of a speaker, so a power amp is needed to crank shit up. A dumb idea is to plug the output of a power amplifier into anything other than a speaker. Poofsky.
Again, hopefully your equipment is all +4. It won’t be - you’ll have some guitars and keyboards and, of course, mics, and they won’t be at +4, but that’s why you have preamps. Plug the mic level and instrument level and consumer level stuff into a preamp, and add gain to get it to read 0 on the meter. Now, going out of your DAW or mixer, you might be feeding into a pair of “consumer level” active monitors. Usually there’s a switch so you can match the Pro Level output gain to the consumer level input gain. If you’re thinking the switch knocks off at about 14dB of gain, you’re right.
GAIN STAGING WHEN TRACKING
Ok, here we go.
Starting with a mic preamp: Turn the input gain all the way down. Set the output gain to Unity. Plug in the mic. Have the singer or musician play, and turn up the Input Gain until the meter is reading 0, or nominal. Done. If the meter has slow ballistics and you’ve got drum fast transients, run the meter a little lower, like -10 or -15. Slow transients? You can run it a little hotter and increase your S/N ratio. But really, unless you’ve got slow meters and fast transients, park it around 0 on the meter and move on.
Plug the output of the mic preamp into whatever is next - a compressor, an EQ, etc. Set the EQ flat, set the compressor threshold all the way up, etc. If there’s an output level control or makeup gain set that to Unity, that is, to 0 or to 8 or whatever. Watch the meter. If there’s no input to adjust it should hang out around 0. If there’s input gain then set that to Unity or play with it until the meter is at 0. Now, as you adjust the EQ or the compressor to change the signal, the gain will change, so you’ll have to adjust the Output level perhaps, or the input level - it depends on how crazy the gain change might be.
You keep going until you reach what your final stage is, either an analog tape deck or a digital tape deck, or a DAW, or perhaps a live mix console... whatever.
Hit analog tape at 0 on the meters, unless it is drums, in which case hit it a little lower unless you want distortion. Hit digital tape decks, like ADATS and DATS and Sony DASH machines as hard as you can without going over.
Hit DAWs at around -18 to -12dBFS. Yes, you can hit it harder, but for now, you want things bouncing around in that -18 to -12 area.
ADJUSTING LEVELS
Now, where do you adjust the level if things are hot at the tape deck or the DAW? Well, the best place is the Mic Preamp input. Yes, it will screw up your compressor settings a bit, but that’s life and engineering and you’re paid to tweak things. The mic preamp is doing almost all of the work here, so that is where you adjust it. When tracking, get in the habit of setting levels at the earliest spot in the signal chain, at the preamp. And NEVER (and I mean this almost absolutely) use a fader to fine tune your gain. The exception: if you’re riding levels while tracking, then use the fader. Other than that. Leave it at Unity. Have I made this clear?
Always do this. It will save your ass.
Always set your output levels when tracking to Unity. Especially on a console. When you’re tracking, all of the faders should be at the 0 mark on things. DO this RELIGIOUSLY. Here’s why.
Faders get bumped during sessions because that happens. If you always set them to Unity, then if they get bumped you just set them back to 0 (Unity). You need to pull a mic down quickly? Pull it down. When you bring it back up, place it where it always should be, at Unity.
True story. Was live tracking a band and we had about 27 mics going into the console. Took HOURS to get levels. Irate girlfriend of lead singer came in, caused a huge ruckus, running around the room screaming, and she ran to the console and moved all the faders around! “There,” She said! “I fucked up your mix.” I think I yelled at her. She stormed out of the room. Band was very upset. “Oh no! She wreaked our levels that took HOURS to set,” cried the guitar player. “Luke, I am so sorry...” said the lead singer.
I laughed. Slid all the faders back up to... WHERE THEY ALWAYS SHOULD BE WHEN TRACKING. Unity. 0. Band loved me and bought me a pony after that. Named the pony Unity.
MISMATCHED OPERATING LEVELS
When you’re feeding something low level into something higher level, you want to adjust things at the INPUT STAGE of the higher level piece of gear. So, with a low level mic going into a preamp, you tweak the gain of the preamp. If you’re plugging some strange shitty consumer -10 compressor you bought into a +4 thing, add gain using the +4 device’s input trim.
What if you feed +4 into -10? Well, turn DOWN the output of the +4 device by about 14dB so you don’t overload the -10 device.
FINITO
AND... there you have it. Gain Staging. It’s easy. This blog post is done. What follows below is a bunch of common sense hints that are worth following.
See ya next week.
COMMON SENSE HINTS
1) Nominal is nominal is nominal. If the operating level of each piece of gear is the same, then setting everything to nominal will work. When in doubt... NOMINAL.
2) Set levels as hot as possible without getting distortion. You’re always trying to maximize the s/n ratio.
3) Use the hottest mic possible. It’s really hard to overload a modern condenser, let alone blow it out.
4) Preamps generally have a lot of headroom, so they can usually be run pretty hot. But LISTEN. Some preamps overload in a nice way, others crack and snap. And this sounds like shit. When in doubt, back it down a bit. You can always add distortion later, but you’ll never get rid of it once you have it.
5) Most mechanical (dial) meters are VU and have slow ballistics. Run your level lower on these when it’s percussive stuff, and at nominal for everything else, including entire songs. You can run your level higher on VU meters when the transients of the input signal are slow.
6) LED meters might appear to be fast peak type meters, but in my experience they usually have similar ballistics to a VU meter. Run some drums through it, run some vocals through it, watch how the meter responds. Or look in the goddamn manual.
7) Want to calibrate everything in your signal chain? Stick a guitar amp in the room without a guitar plugged into it, crank it up so it hisses (white noise). Throw a mic in front of it. Plug the mic into a preamp with the output at Unity and adjust the input gain to get it to 0 on the meter. Feed that through each piece of gear in your signal chain until you get to tape or DAW. No guitar amp? Mic the fridge. Or water running in the sink. Don’t get the mic wet.
8) The above is too much work? Turn your mic preamp input all the way down. Set the output of everything to Unity. Set the input gain of the rest of the signal chain to Unity. Provided everything is at +4 operating level you’re done.
9) You’ll make WAY less mistakes when patching things if you always think OUTPUT feeds the INPUT, and always plug stuff in that way - the patch cable goes into the OUTPUT first then you plug it into the INPUT. If I’m doing a complex patch or I’m using a strange patchbay (and I am old and my brain is turning to shit so most patchbays are strange to me these days), I say in my head or even out loud, “The Mic pre output goes into the TLA-50 input. Then I grab the next patch cable and “The TLA-50 output goes into the Pultec input...” I have always done this, even when I was young and smart and fast. It reinforces the signal flow in your head, it eliminates almost all patching errors, and it keeps you from looking like a fucking moron during a recording session because you patched something wrong.
10) When patching in STEREO, put the patch cord for the LEFT signal in your LEFT hand and the RIGHT signal in your RIGHT hand, and then do the above: “The preamp outputs feed the compressor inputs..” Always put left in left and right and right and you’ll reduce the chances of cross-patching something to like 0. I don’t know why schools don’t teach this shit. It will save your ass.
11) Another stereo hint. I always put Left side signals on Odd numbers and Right side signals on Even numbers. And I always put them beside each other. SO, if I have a stereo pair of mics as overheads, the left is plugged into 9 and the right into 10, as an example. I NEVER break this rule. live mixing too. If something's on the Left side of the stage I want it on the Left side of the console so I can grab it with my Left hand. It keeps everything straight in my head. Of course, if something happens to one of my hands, like it gets bitten off by a pony, then it’s mono for me.
12) Tape stuff down if you don’t want it bumped.