
Double Compressions Changes Everything
Double compression is an awesome technique that totally upped my engineering chops once I mastered it.
It's basically using two compressors in series (one after the other) on a sound source. I mainly use it while tracking, but it is handy to use mixing as well, and in this blog post I'll give you ideas and settings for both applications.
A lot of this post will be centered around vocals, but the technique can be used for anything, although I use it religiously on vocal and bass. Religiously. I don't track either of those sources without double compression on them.
I was shown a double compressor by an engineer named Fred. He had been at Media Sound in NYC in the 70s, which is where he learned it. I was working in his studio, tracking a crappy bassist. Fred came in, put 2 DBX 160a's on the channel, tweaked a few knobs and lo and behold, suddenly it seemed the guy could actually play.
Why Two Compressors?
Recording on analog tape was really an exercise in minimizing tape hiss, and the most important thing you could do was record your tracks at as high a level as possible to get as high a signal to noise ratio as possible. Yes, you wanted a signal to have dynamics to it, that interesting up and down of volume and intensity that conveyed emotion, but you didn't want to overload things so much so that you heard distortion, and you didn't want things so quiet that they "fell into the mud,” down in there in the hiss.
Ideally, say with a rock vocal, you wanted to restrict that singer’s output level to about a 9dB swing on the VU meter, with the quietest stuff down around -7 and the loudest about +2, just moving out of the red — call this Maximum Meter Swing. Usually, though, for the majority of the vocal, you want a much tighter meter swing.

You could, of course cut the vocal higher than that, especially if it was a screamer for a singer, because they were already reducing their dynamic range by screaming. Having a vocal hit the tape a little too hard on high, loud notes sounded good, too, adding a little extra grit and mojo.
With a singer with good mic technique, cutting a vocal was easy; you'd throw a DBX 160 or a 1176 on it, or if you were at a better studio an LA-2a (or if you were really lucky a BA-6a or, gulp, a Fairchild) on at and you were done*.
But if the singer was all over the place, you'd need a lot of compression to get it on tape correctly, and lots of compression sounded bad — pumpy, with a loss of high end. Again, sometimes you wanted that if the genre called for it, but not usually.
3 to 6dB of gain reduction on a vocal was usually inaudible, but if that climbed up into the 10 to 15dB range, it sounded terrible to my ears.
Double compression solves the issue by splitting the amount of gain reduction needed across two compressors. The first compressor handles the first 6dB on compression; the 2nd compressor takes care of anything above that. Think sometimes none, often one, sometimes both. Also, because the waveform is "pre-compressed" when it hits the second compressor, the second doesn't impart as many negative artifacts to the signal. In fact, you can really squash hard with the second compressor without it sounding awful.
These days, y'all don't worry about signal to noise ratio that much, but mastering double compression means much less work in the mix automating and fixing things because levels are a mess.
Double compression changes the way you track dynamically active signals. I was able to lay these gorgeous vocals on tape that required almost nothing in the mix in terms of automation (I hated using automation - another thing to write about). I started using double compression on bass, acoustic guitars, sometimes on percussion—anything that was all over the place on the meters got double compressed while tracking it down to tape.
Tracking/Analog Settings
I went through a bunch of different compressor setups back in the day, and sometimes I was limited to what was in the studio, but my usual setup was/is a Summit TLA-100 followed by an Aphex 551 Expressor.
Base settings were generally compressor 1 is "softer and slower" and the compressor 2 is "harder and faster."
Compressor 1:
I usually use a soft knee compressor with a ratio under 4:1. I want a fairly slow attack and a longer release. Ideally, the attack is long enough to let some of the transient through so there is some punch, and the release is long enough so that the output is consistent.
Compressor 2:
I use a hard knee setting, and the ratio above 8:1. I want the attack fast so that it hits fast transients coming through — sort of like a limiter — and the release fast as well.
When setting these two, of course use your ear, but you also need to watch and interpret the meters. I prefer VU meters, because I'm so used to them. The output level meter to watch is that of the second compressor, or the input meter of the channel. Again, I prefer swinging arm meters over bars that light up.
When things are very quiet, I don't want to see any movement on the gain reduction meters and I'm looking for output levels to be around -5dB or so, certainly not much less than that.
As signals get louder, I want to see the first compressor meter moving, but not by much, and no activity on the second compressor's meter.
Once the signal hits its "average performance" level, I'm looking for the first compressor to be in steadily, with the gain reduction meter swinging down to around -2 to -5dB. The meter movement, as I often write, should look like the way the signal sounds.
The second compressor's meter should be very twitchy and jumpy, moving a lot but not by very much. The output meter of the second compressor should hang around 0, the VU meter on the console matching it.
When things get loud, both compressors should be in a lot, the first for 6dB to 8dB on gain reduction, the second for, well, basically whatever is needed to keep the output meter from getting above about +3dB.
There are also times when the second compressor might kick in for a split second and the first doesn't do anything — this should happen when a really fast transient goes by, like a slapped bass note.
Now, the levels on your digital input... this could be argued over and discussed til everyone is dead. I try to keep the max peaks under -6, with things averaging around -15dB. This correlates well with my experiences using analog tape, giving me about the same headroom. But there are no firm rules here, and everyone does this differently. And please note these are levels for TRACKING into an individual track. These are not not not suggested mix bus or group bus levels.
Mixing/Digital Settings
You modern guys don't have tape hiss as an issue, and I'll bet a lot of you are tracking with a mic through an interface, riding bareback with no hardware compressor, and then compressing on the mix side. Here are some settings for you, using the Pawn Shop Comp. Two instantiations on one channel are PERFECT for this sort of application, perhaps even better than perfect.
The basic idea is the same as tracking: we want the first one soft and slow, the second hard and fast. Here are some visuals along with settings from an actual session fixing a vocal.
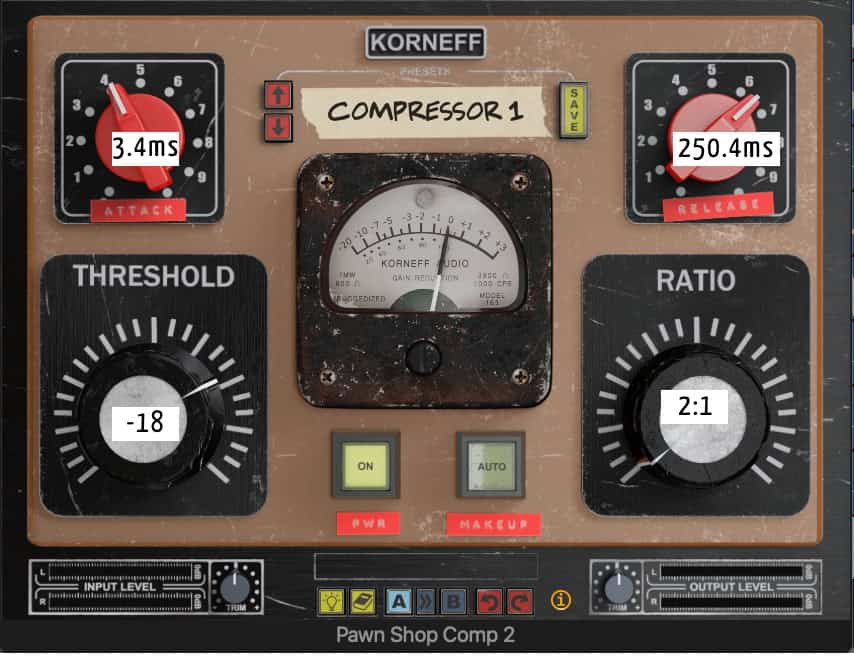
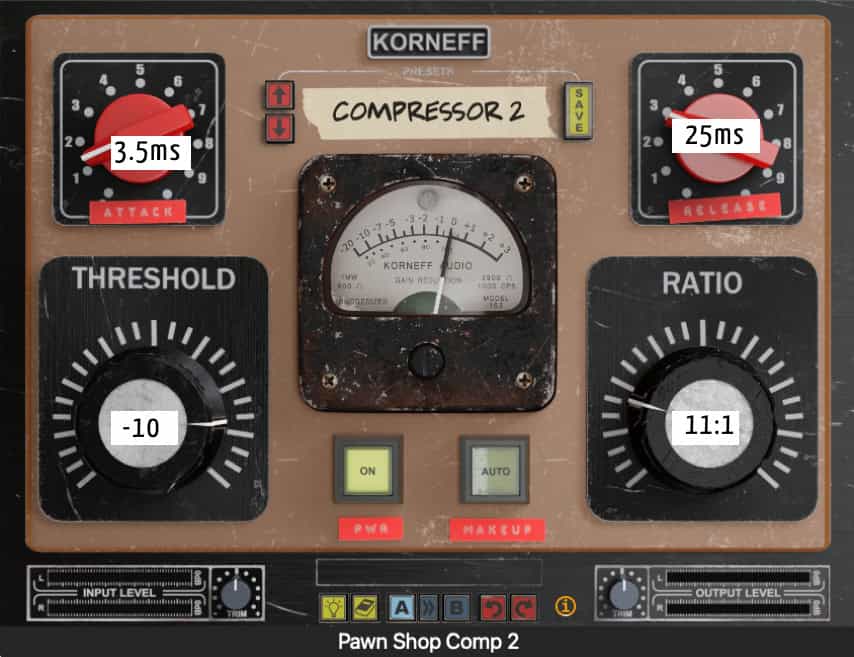
The critical setting is going to be the threshold. On Compressor 1, watch the meter and listen. You want a sluggish, sort of musical movement to it. On compressor 2, the movement should be twitchy and fast. That meter shouldn't "lock up" until that signal is loud.
The rear panel controls of the PSC offer you a ton of extra options. Here are some ideas:
On the first compressor, use the tone controls to "push into" the second compressor in different ways. For example, if something is a bit too warm, like a chesty vocal, cut a little at 171Hz and see how that affects the overall functioning of both compressors. Remember, you can always restore stuff using the tone controls on the second compressor.
I tend to boost highs on the second compressor, rather than the first. It just seems to work better. +3dB @ 2.4kHz is a nice touch.
To get a more aggressive sound, use the preamp on the first compressor to add some saturation.
To get a more classic late 60s 70s soul music vocal sound, set the preamp of the second compressor such that when it gets hit hard there's a bit of grit on the vocal. There's also the OPERATING LEVEL control of both compressors to play with.
Man, if I had two hardware Pawn Shop Comps, I would be in tracking heaven. If you’ve not played around with the PSC yet, get a demo installer and use it.
So there you have it, a bunch of settings and a bit of backstory.
And now, as Fred used to growl at interns in the studio, "Go cut that 'f**king track."
*Do you all realize how spoiled you are when it comes to compressors, these days?
Additional Notes:
Most of the time, back in the day, compression was used to restrict dynamic range, not to give something character. The whole "character piece" thing... I don't recall that from my years in the studio that much. Gear either sounded good or it didn't, you either liked it or you didn't. I was usually looking for things to not sound compressed.
The Summit TLA-100 is a monster. It's a tube compressor but it doesn't sound or work like a typical opto or vari-mu unit. It's really versatile (it has switchable attack and release times) and can be used on literally anything. My Desert Island compressor... other than the Pawn Shop Comp.
The Aphex 551... why this compressor never achieved huge fame is beyond me. It is very clean — probably a little too uncolored for most people — and it has adjustable EVERYTHING: attack, release, ratio, knee, upward expansion of the high end, keying, etc. Probably too many controls for most people as well. But man, you could make this thing sound punchy or as utterly invisible as required.